Monday, September 21, 2015

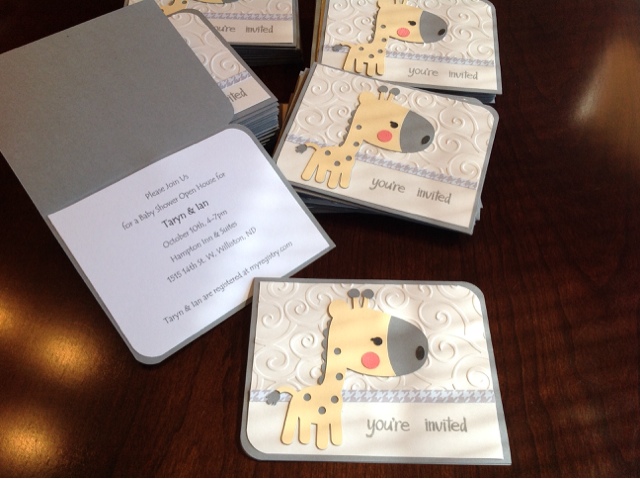
You're Invited!

I am about be a grandma for the first time and I am over the moon!  I offered to make the baby shower invitations.  After completing sixty identical invites, I realized I might have a bit of a scrapbook hoarding issue.  I was able wo make them without having to purchase a single thing!  It was actually kind of nice not having to scramble (scramble=get dressed and leave the house) to find something to complete a project.  But I digress.  Love the way these cute cards turned out, and so did mommy-to-be!


Sunday, September 6, 2015

I'll Get You My Pretty...


Okay, so I haven't posted in like, forever, but I saw something over at My Pink Stamper that I had to try.  Robyn is a Stampin' Up! Demonstrator again and posted an adorable kit of a paper witches hat, view here.  I ordered the kit but was so excited about the project I had to see if I could  make it myself using my Cricut Explore!

It took my daughter and I five hours to complete but remember we had to cut, ink and glitter everything, not to mention finding just the right papers for the project!  My version is not as big as the Stampin' Up! version as I was limited to 12 inch paper, but I think we nailed it!


We used an assortment of papers, ranger distress ink (lots) and sticklers (awhole bottle).  The base is an eleven and a half inch circle.  I cut three, one out of the paper you see, one out of chipboard and one out of black card stock, then glued them all together and used a black Sharpie to color in the edges.  I glued half of a styrofoam ball to the center then glued long triangles of paper to it to create the "pointy" top part of the hat. Once the top was complete we Stickled all along the spiderwebs on the paper. The frills are  three  2.5 by 12 inch strips of card stock "frilled" every 1/4 inch, glued end to end, inked, curled and wrapped twice around the top and secured. We wrapped a ribbon around the  frills and secured.

The leaves are cut with the cricut explore from various cartridges, veined with an embossing stylus, crinkled and inked.  Sarah did an amazing job on the leaves.  They are strung together on orange distressed bakers twine and wound around the base of the hat.  We glued a few leaves at strategic points to secure.

The stamp set is from Stampin' up! , cut the orange tag and the spider web on my Explore.  I jujjed  it up with black and orange banned tabs, crystal effects, and black rhinestones.  The finishing touch is the spider charm dangling from the point of the hat!

The finished piece stands just under a foot tall and will be a wonderful addition to my daughters Halloween decorations.  Can't wait to get my kit from Stampin' Up! To make one for myself!

Sunday, May 6, 2012

NSD Ribbon Flower Challenge

Renee, over at I Came, I Saw, I Created, challenged us to create a flower made from ribbon or material.  I have been jonesin' to use this zebra ribbon ever since I got it and this fun picture of my teenage daughter was the perfect application. 


To create the flower, all I did was take about a foot of ribbon and hand stitched a running thread along one edge.  I then pulled it tight and tied a couple of knots to secure it.  A little fluff, a clear pebble and viola! 


NSD Emboss It Challenge!

Carissa, at Sprinkled with Glitter challenged us to make a project using embossing.  I created the following card using three different types of embossing.  The first was wet embossing using Crystal Effects.  I used it on all the black areas of the lady bug to give her shine!  The second was dry embossing using the Cuttle Bug and the swiss dots embossing folder on the green background.  And last but not least, I used heat embossing on the stamped salutation (Buggy Punnies from my pink stamper).  The little bee was cut at 3.25 inches using the Create a Critter cartridge.


NSD Lets Get Moving!

"Lets Get Moving" is the challenge Missy over at Quick Chick Designs put to us.  With two busy boys, I have so many sports pictures to scrap, this was super easy for me. 


Recipe:

K & Company Donna Ingemanson Rough & Tumble Paper
Cricut Baseball Cartridge
About a Boy Cartridge

Sunday, January 29, 2012

Banana Nut Bread and Orange Spice Cupcakes!

I started Weight Watchers 3 weeks ago and it is going great. The weird thing is, I generally hate to bake and now it is all I want to do. I don't necessarily want to eat what I bake, I just want to bake. Weird, huh? Today I made banana nut bread, my husbands favorite and Orange Spice cupcakes!  Forgive the mismatched seasonal wrappers, I am trying to use up all the extras I have and am going to just buy white from now on!

Orange Spice cake

  • 3 cups cake flour sifted
  • 2 1/2 teaspoons baking powder
  • 1/2 teaspoon salt
  • 1/2 tsp ginger
  • 1/2 tsp cloves
  • 1 3/4 cups granulated sugar
  • 2/3 cup butter or margarine
  • 2 eggs
  • 1 tsp grated orange peel
  • 1 1/2 orange extract
  • 1 1/2 teaspoons vanilla extract
  • 1 1/4 cups milk
Preheat oven to 350°F. Sift together flour, baking powder, spices and salt; set aside. Cream sugar and butter together until light. Add eggs, orance extract, orance peel and vanilla to creamed mixture and beat until thoroughly mixed. Add flour mixture to creamed mixture alternately with milk, beating well after each addition. Continue beating one minute. Pour into cupcake liners. Bake 15-18 minutes or until toothpick inserted comes out clean. Remove and cool completely before decorating. Yeilds about 12 standard cupcakes.  ( I doubled this recipe)

The frosting is 3 tbls butter, 8 oz cream cheese, 2 tsp orange extract, and orange food coloring creamed togerther then slowly add 4 cups powdered surger.  Easy peasy lemon squeezy!

Wednesday, January 25, 2012

Peppermint Bon Bon Cupcakes!

Peppermint Bon Bon icecream is my absolute favorite icecream.  I figured if it is good as icecream then it has got to be good as a cupcake. Not only are they delicious, they are super cute too!


I used a dark chocolate cake mix and a super simple cream cheese frosting, then decorated with mini chocolate chips!


Peppermint Cream Cheese Frosting

8 oz. cream cheese

4 cups powdered sugar

1/2 tsp peppermint extract

1/4 tdsp vanilla

2-3 tbls milk

green food coloring


Mix all wet ingredients, cream till well blended then add powdered sugar 1 cup at a time till smooth.


Super simple, right?

Monday, January 2, 2012

I'm back!!!!! In in my NEW Scraproom!

Wow - it has been forever since I have posted here on my blog.  I really have missed it, but have a good excuse, really, I do!  As most of my followers know, we live in rural North Dakota, out in the country.  But not any more!!!!  Once again, it is proven to me that good things come to those who wait!

Last April we got a letter from the county that the land right next door had been sold and they were planning an asphalt plant, gravel pit, shop, office and quarters for their staff.  Devastated, we went to the hearing and of course all of our concerns and pleas fell on deaf ears and the plan was approved.  Long story short, we sold our place in the country and started the house building process in town.

Our home sold in 2.5 weeks and we were out 10 days later.  We are experiencing the largest oil boom in the areas history, so housing is non-existent.  Part of the sale of our home was that the buyer provide a suitable home for our family till our house was complete.  My husband, our 3 teenagers and I moved into an apartment (sans all scrapping stuff, which was carefully packed away awaiting it's very own room in the new house!!!)  What an adventure apartment living was.

In addition to all that chaos, I quit my old part time job and started a full time job.  So with that, moving into our new home, the holidays and a wicked case of bronchitis that has held on for 6 weeks, this blog had to be put on hold.

The house turned out lovely, room for everyone.  We have had more company in the past 2 months than we had in 5 years out in the country.  We are settled in nicely and I finally have my scraproom all to myself and I'd like to share it with you.  I still have a lot of decorating to do but it is finally functional.  Voila:


I love, love, love my work table, plenty of room to scrap with friends!


I had this hutch at my old place but love it in my new space.  It closes up to hide all the mess but I rarely close it up!  The top shelves hold all my card stock, the drawers are so handy for all the things I constantly use.  It also houses my Cricut Expression.  So convenient.


Here is a peek inside one of the smaller drawers,  all my Stickles and embossing powders.  Pop dots are in another and adhesives in yet another!  So handy.


I used legal size hanging folders and pocket files to store my scrap paper in the large drawer to the lower left.   Each is for a different color and I have made it a habit to check here for paper before I cut a new sheet.  I am using way more scrap paper than I used to.


In this corner I placed my huge metal drawer cabinet and old printer table that my dear hubby painted black.  The printer table holds my Cricut Imagine and cannisters of primas sorted by color.


Here is a peek at how I store my cartridges in the huge file cabinet.


And my ribbon and Primas


And my stamps and ink.  I have converted many of my Stampin' Up! stamps to cling and they are stored in the CD cases on the right.


More importantly, I have begun to scrap again and am over the moon!  Please to enjoy my first few pages from my new favorite place on earth!


Happy New Year Everyone!


Sunday, May 8, 2011

MPS NSD 11 - Pink Green & Black

I am sad that I only got through 6 challenges on Robyn's National Scrapbook Day extravaganza.  I guess I should be happy that I got to participate at all with as busy as I have been lately.  Any way for this last challenge, I used the Forever Young cartridge.

MPS NSD #9 Glitz Glam Glitter

This challenge from Robyn over at My Pink Stamper was so super fun to do, I mean who doesnt love glitter, right?  All cuts on this page are from the Old West cartridge.  I wish this photo showed how glittery this page really is.  Lots of glitter paper, rhinestones and tulle!

MPS NSD #7 - Make A scrapbook page!

Love this challenge issued by Robyn over at My Pink Stamper.  It just allows us to do what ever!  I used the Wild Card cartridge for the title and Paisley for the boots!


MPS NSD # 5 - Anything but!

Karlee, one of Robyns designer (and BFF) asked us to make anything but a card or scrapbook page.  I had been holding on to these cute little purses for a few years.  The  actually had candy in them at one poing and I thought they might make cute gifts if recovered.  And that is just what I did!


MSP NSD #2 - Something Krafty

Our second challenge from Robyn was to use Kraft cardstock on a project.  This A2 sized card has a Kraft Cardstock base, I enbossed the white with the Cuttlebug,  a torn strip of card stock and some striped ribbon completes the base.  The be is cut from velvet paper from the Home Decor cartridge.


MPS NSD 1 ~ Cupcake

For the first challenge over at My Pink Stamper, Robyn challenged us to make something with a cupcake in it.  The title is cut from Wild Card and the cupcake is from Simply Charmed,  Patterned paper is SWEET from DCWV. 

Tuesday, March 1, 2011

Arrgh ~ A Pink Stamper Challenge, Me Mateys!

Robyn over at My Pink Stamper is out cruising the high seas with her matey's and me thinks this is a mighty fine submission for her challenge!   Arrgh ye landlubber's, feast yer eyes on this!


RECIPE
Skull paper by Stampin" Up! Rockabilly Paper (retired)
Stampin" Up! Old Olive
Pirate cut at 4.5" from 3 Birds on Parade
 Letters by Creative Memories
Striped Grograin Ribbon 7/8 " wide

Sunday, February 27, 2011

A Walk Down Paisley Road

These papers by Prima Marketing have got to be some of my favorite ever!    Tammy over at Lil' Lamb's Boutique really hit it out of the park with this this Deluxe Kit. The colors are so lush., the embellies are so sparkly and fun and I just love the way the florals all works so splendidly together! These pages almost made themselves! 


I'd been wanting to scrap this photo for so long and the colors in this paper matched her little jumper perfectly. I just love the lines on this paper ~ it makes journaling a snap!


I think this last page is my favorite out of the bunch.  I very rarely cut my photos into shapes but I really wanted to retain the feel of a flower that this paper had.  So I made my messy little sweetie the center of the flower by matting her photo in 1/4 inch larger crircles.


I used the scraps to make a couple of cards. 

Sunday, February 20, 2011

A Couple of New Arrivals!

Our family was recently blessed with a new arrival, so I needed to make a card for my sweet little grand niece, Lucy. I am a sucker for pink, so I used alot of it on this one.  The cuts are from New Arrival and Mini Monograms.


I figured while I was at it I might as well add to my card stash and make a baby boy card also.


Wednesday, February 9, 2011

Life is PixieLicious!

Work life overtook scrap-life for the past few months but I think I see light at the end of the tunnel!   Yay me!!!!  This adorable kit PixieLicious by Cosmo Cricket has been on the top of my MUST USE lists.  The colors in this kit from Lil' Lamb's Boutique are so pretty and the embellies are a-mazing!


The title strips in this kit make it soooooo easy to put pages together, I actually was able to make all three of these in one afternoon!  I tell you, the mojo was flowing!


For this last one, I wanted to see if I could make this paper less girly looking and use for one of my son's.  I suceeded by using a strip of aqua patterned paper form a My Mind's Eye stack I had laying around.

Tuesday, February 1, 2011

Happy Valentine'S Day!

Just a quick post to share the card I made for my dear hubby this year! Love you Honey!

Sunday, November 14, 2010

Vinyl Wall Art with the Cricut

Although I have used vinyl to decorate my car  windows, I have been a little nervous to try it on my walls.  Not sure why I was so nervous because I can now report it was a cinch.  I have to thank my daughter for giving me the push to try this.  We redecorated her room this past summer and she finally got the furniture the way she likes it, so it was time for some words.  She loves music and this is what she wanted.


I think it turned out pretty great and she does to.  I used Lyrical Letters and the musical notes are from the Hannah Montana cartridge.  I used my gypsy to weld the letters and notes together.  The brown vinyl is from Provocraft.