Sunday, September 26, 2010

Abby ~ Abby Normal

Monday begins Homecoming week at my daughters school.  Tuesday is dynamic duo day.  She and her friend are going as Dr. Frankenstein and Igor.  They were able to see the Broadway production of Mel Brook's Young Frankenstein on their band trip last summer.  They thought it was hysterical!

So today, I had to come up with an abnormal brain in a jar and a tunic and cowl with the requisite "hump"!  I was stumped on the brain but then it came to me. Heat set modeling clay rolled into long thin noodles and applied in brain like patterns to a base of clay covered tinfoil.  After we baked it, we gave it a coat of paint and several coats of sealer and floated it into some green tinted water in a jar.  Here's the result.


Pretty realistic, huh?  She is going to set it in the middle of the table at lunch!  LOL  For her costume, I bought some super cheap broadcloth.  I found the pattern for the cowl on line by googling "make medieval cowl" and then just a simple tunic.  I think it turned out hysterical. 


How funny is this?  I know this isn't a scrapbooking post, but I am definitely going to scrap these pictures! 
Tuesday, September 21, 2010

Kaiser Kraft Prairie Lane Snowflakes?

When I saw this beautiful paper (Kaiser Krafts Prairie Lane from Lil' Lambs Boutique) all I could think of was snow flakes.  I know, how could I think of brown and blue and snowflakes, weird right?  But just look at the final product before you judge me.


I am digging this fanfold look!  I had never tried it before but it was actually pretty simple.  If you want to see how I did it, there is a tutorial video at the end of this post.  Below are a few closeups.


This is a pretty thick layout (about a half an inch) and I am not even sure if it will fit in a page protector.  If it won't fit, I will just have to frame it! I really love the texture the fanfolding gives it and will definately be trying this again!


Tuesday, September 14, 2010

Just Because Cards ~ Super Simple Layering!

I just received this cartridge today and I gotta say, I really think I am going to love it!  It is super simple to layer and all the work is done for you.  A co-worker brought some of her garden produce ~ so yummy~ and a thank you was in order.  I thought this cute card fit the bill perfectly!


All cuts (except for the green layer behing the tag which was cut at 5.75") were cut at 5.5 inches.  I recommend starting with th card base first.  Decide how big you want the overall card to be, then simply leave the size alone.  All cuts are scaled to the card base!  So simple!

Sunday, September 12, 2010

A super simple layout!

Sometimes I get so involved with all the tools and embellishments of scrapbooking, that I forget that my true style is clean and simple.  So here's a layout that is back to my roots - clean and simple!


I  used Paperdoll Dress Up and Lifes a Beach carteidges for the cuts.  The green polka dot  background paper is cut at 8.5 x 11 and slide beneath the waves.  I simply  a slit along the waves and tucked eveything behind them.  I love how the colors bring all the attention to my darling little priate!

Wednesday, September 8, 2010

BEWARE ~ This is a cute card!

I love Halloween, always have.  So when Mary, over at Card TV, challenged us to make a Halloween card, I was super excited!   I recently bought bothe the October 31 and the Happy Hauntings cartridges and used cuts from both on this card!


This 5.75 x 5.75 card fits perfectly in a 6 inch square envelope.  The house is made with strips of grey Bazzil card stock, cut at .75" , inked and layered.  The "brick"is just a piece of terra cotta card stock that I used a white gel pen to draw in the mortar and then dabbed ink on to age.  The window was cut at 2.75 and the sign bracket at .75 from the Oct. 31 cartridge. The other cuts are Happy Hauntings. The ghost in the window is cut from vellum at 2.25", the fence is at 3" and the pumpkin at 2.5".   The moon was cut at 2.75" with my MS Circle  cutter and the "beware" is a sticker from MS Halloween line from 2007.

Thanks for the challenge Mary - this was super fun to do!

Friday, September 3, 2010

A Quick, Cute Easel Card

My sister in law sent my youngest son the cutest card that she had stamped and I thought the sentiment would go perfectly with the crab from Create a Critter.  When I finished this quick easel card, I had to giggle.  It just turned out so stinkin' cute!


The base is Bo Bunny Double Dot cut at 11 x 4.25 inches.  I scored it with my Martha Stewart Scoreboard at 2.5" and 5.5 inches.  The salutation is printed (from my computer) and trimed to 2 x 4, layered on navy & sandpaper, then  pop dotted  to the inside of the folded card.   I glued on some seashell shaped buttons just for fun.  The "sand" is a strip of sandpaper! The crab is cut at 3 " and the presents and hat are cut at 1.5" from the Sweet Treats cartridge, then popdotted off the sand! A touch of Ranger Stickles glitter glue adds that perfect touch of sparkle.


Here is what the card looks like closed.  The ribbon is from Hobby Lobby. The A4 card fits in a standard invitation envelope.

Wednesday, September 1, 2010

Graphically Speaking ~ This is a great Challenge!

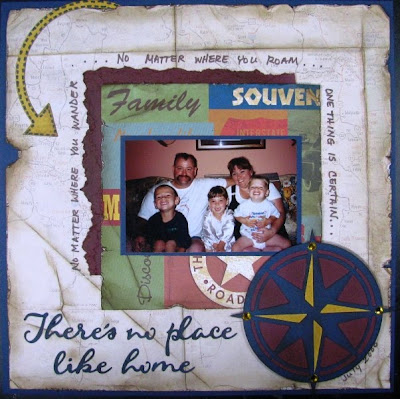
Robin at Fantabulous Cricut challenged us to create a card or project incorporating a vacation or travel.  Now I personally love to travel, but one of my favorite things about traveling is how incredibly good it feels to come home.  So here is my offering for this challenge.


This 12 x12 layout is done with Stampin Up!Night of Navy card stock.  The patterened paper is something I won at a crop so I am not sure who it is by. Thearrow and compass are from the Graphically Speaking cartridge and the title is the Gypsy font welded on my Gypsy.  How did I ever scrap before I owned my gypsy?  I did pull out my distressing tool and inks dor this layout and am very pleased with the over all results.